Great archery form is not magic — it is physics and anatomy working in harmony. Understanding the biomechanics of archery transforms your practice from guesswork into a science. When you know which muscles are supposed to fire, how skeletal alignment transfers force, and where the mechanical advantages in your body lie, you can diagnose your own problems, train more efficiently, and prevent the repetitive strain injuries that sideline so many archers. This guide explores the science of the perfect shot — from force vectors to back tension, from bone alignment to injury prevention.
🔬 Archery Biomechanics at a Glance
- • The ideal archery draw uses back muscles, not arm muscles — your arms are just structural links
- • Bone alignment allows the skeleton to carry load, reducing muscle fatigue
- • The T-shape alignment at full draw is the foundation of consistent release
- • Back tension release eliminates anticipatory muscle action that destroys accuracy
- • Archery primarily loads the rotator cuff, rhomboids, trapezius, and latissimus dorsi
💪 The Muscles of Archery: What Is Really Doing the Work
Many beginners think of archery as an arm sport. Elite archers use their arms primarily as rigid connectors between the bow and their back musculature. Understanding which muscles should dominate the draw cycle is the single most important biomechanical insight in archery.
The Primary Drawing Muscles
Rhomboids (Middle Back)
The rhomboid major and minor are the stars of the archery draw. These muscles connect the inner edge of your shoulder blade (scapula) to your spine, and their job is to pull the scapula toward the spine — exactly the action of drawing a bow.
When you feel the pull deep in your middle back between the shoulder blades, that is the rhomboids working. A proper draw should feel like you are pinching the shoulder blade toward the spine, not pulling with the elbow.
Trapezius (Upper and Middle Back)
The trapezius is a large, diamond-shaped muscle covering most of the upper and middle back. In archery, the middle and lower trapezius depress and retract the scapula — critical for maintaining proper shoulder position during draw and hold.
Common problem: archers who shrug their draw shoulder are using the upper trapezius instead. This elevates the shoulder, changes the draw angle, and causes inconsistency. Focus on pulling the shoulder blade down and back, not up.
Latissimus Dorsi (Lats)
The latissimus dorsi is the broad back muscle running from the lower back up to the upper arm. In archery, the lats assist in pulling the draw arm elbow back and down during the draw, and help stabilize the bow arm shoulder against the bow's forward force. Strong lats allow you to draw heavier bows with better form and reduce the temptation to use the bicep as the primary draw muscle.
Rotator Cuff (Shoulder)
The rotator cuff — supraspinatus, infraspinatus, teres minor, and subscapularis — stabilizes the shoulder joint throughout the shot cycle. Both the bow arm shoulder and the draw shoulder rotator cuffs work continuously during archery.
Rotator cuff weakness is the most common cause of archery injury and is almost always the result of poor technique combined with insufficient warm-up. Strengthening the rotator cuff off the range is one of the highest-value injury prevention strategies for archers. See our archery exercises guide for specific rotator cuff work.
Secondary Supporting Muscles
Core Muscles
The erector spinae, obliques, and transverse abdominis maintain upright posture and resist rotational forces during the draw. A weak core leads to body sway during the hold — especially noticeable at longer distances or in wind.
Forearm and Hand (Draw Hand)
The finger flexors hold the string. Critical insight: they should be under minimal tension at full draw — just enough to maintain contact. Gripping the string tightly creates anticipatory release and poor finger opening at the shot.
Bow Arm (Wrist and Forearm)
The wrist extensors keep the bow hand in the correct low-grip position. The elbow rotators position the elbow out of the string path. These muscles are relatively passive — the bow arm should feel stable but not rigid.
Legs and Feet
The quadriceps, glutes, and calf muscles provide the stable foundation for the entire shot. Ground force is the starting point of the force chain — an unstable lower body creates movement that propagates all the way to the bow arm.
🦴 Bone Alignment: Let Your Skeleton Do the Work
One of the most powerful biomechanical concepts in archery is bone alignment— using skeletal structure to bear the load of the draw rather than relying entirely on muscle strength. Muscles tire; bones do not.
The Bow Arm
The ideal bow arm is almost fully extended with a slight, relaxed bend at the elbow. This position allows the skeletal structure of the arm to bear the bow's pushing force rather than requiring the shoulder and tricep muscles to hold against it. When the bow arm is properly aligned, the push force from the bow travels through bones — humerus, radius and ulna — directly to the shoulder joint and into the core.
A deeply bent bow arm elbow means muscles are doing work that bones should do. This creates inconsistency (muscle tone varies with fatigue), increases injury risk to the shoulder, and often puts the forearm in the string path causing painful string slap. The elbow should rotate outward and downward, not be bent significantly inward.
The Draw Arm Elbow Position
At full draw, the draw elbow should be at or slightly behind the line of the arrow — never dropping below it. The elbow position determines the draw shoulder blade's position. When the elbow is at the correct height, the shoulder blade is naturally in the retracted position that loads the rhomboids for back tension release.
A draw elbow that drops too low shifts the load from the back muscles to the bicep and deltoid — the arm muscles. This is the classic "arm pulling" error that plagues most beginners. For form drills that help correct this, see our archery release technique guide.
➕ The T-Shape: Perfect Alignment at Full Draw
View an elite archer from behind at full draw and you will see a near-perfect T-shape: the arrow (and shoulders) form the horizontal bar, the spine forms the vertical bar. This alignment is not just aesthetic — it is mechanically optimal for every reason that matters in archery.
Why the T-Shape Works Biomechanically
- • Equal force distribution: The bow pushing forward and the draw arm pulling back are equal and opposite forces balanced across the body's centerline. This symmetry minimizes rotational forces on the spine.
- • Maximum back muscle activation: When the shoulders form a straight line with the arrow, the rhomboids and trapezius are in their most mechanically advantaged position — shortest distance to complete contraction.
- • Stable spine reference: A vertical spine gives the draw shoulder blade a consistent reference point. The distance the blade travels from neutral to full draw is reproducible every shot.
- • Efficient back tension: The T-shape is the position from which back tension can complete the draw through the clicker or into the wall — naturally, without additional arm effort.
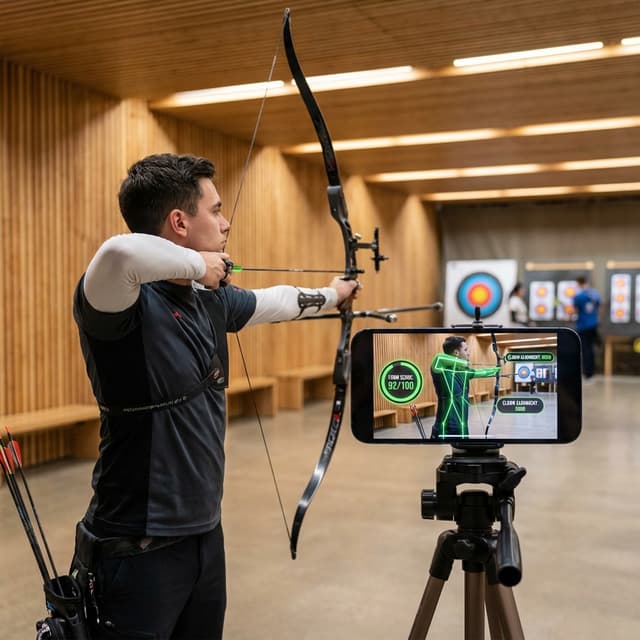
Film yourself from behind at full draw. The bow arm, arrow line, and draw arm elbow should form a straight horizontal line. Your spine should be vertical (no leaning back or forward). If your shoulders are misaligned — one higher than the other, or canting forward — identify which part of the draw is causing the deviation and correct it there. ArcheryBuddy's AI form analysis can identify T-shape deviations automatically from video.
🔗 Back Tension: The Cornerstone of Consistent Release
Back tension is the single most discussed biomechanical concept in serious archery coaching — and the most misunderstood. It is not just about "using your back." It is a specific, active muscular engagement that both achieves a consistent full draw and makes the release happen naturally without conscious finger action.
How Back Tension Works
At full draw, the archer continues to actively retract the draw shoulder bladetoward the spine. This ongoing muscular action — the rhomboids continuing to contract — causes the draw hand to continue moving back, even after the bow has reached its stop (the wall on a compound, or the clicker on a recurve). This continued motion is what triggers the release rather than a deliberate opening of the fingers or activation of the release aid trigger.
The Neurological Advantage of Back Tension Release
Why does this matter? Because of how the nervous system processes deliberate vs. reactive actions.
- • Deliberate finger opening triggers anticipatory body response — you know when the shot fires, so your body braces (flinching, grip change, bow arm movement)
- • Back tension release means the shot "surprises" you slightly — you do not know the exact moment, so there is no anticipatory action
- • This is why target panic affects deliberate releases but rarely back tension releases — it has no deliberate trigger moment to seize upon
- • The result: cleaner releases, better follow-through, and dramatically more consistent shot execution
Common Back Tension Errors
- ❌Elbow pulling: Driving the draw elbow backward with the tricep/deltoid instead of letting the shoulder blade movement lead. Results in an inconsistent draw path and sore shoulders.
- ❌Scapular elevation: Drawing the shoulder blade upward rather than back and down. Activates upper trapezius instead of rhomboids; creates inconsistent anchor height.
- ❌"Fake" back tension: Engaging the draw arm muscles (bicep, rear deltoid) while the shoulder blade barely moves. Looks like back tension but lacks the mechanical advantages.
- ❌Stopping at anchor: Ceasing all effort once the anchor is reached, then trying to aim statically. You should continue expanding through the shot — never be truly static at full draw.
📐 Force Vectors in Archery
Understanding force vectors in archery helps you appreciate why alignment matters and how small deviations in position create large deviations in arrow flight.
The Draw Force Balance
At full draw, three forces act on the system: the string tension pulling the draw hand back, the bow reaction pushing against the grip hand forward, and the arrow's alignment force which must be along the arrow's axis. When all three forces are perfectly aligned and balanced, the arrow launches cleanly in the intended direction.
Any lateral force — from grip torque, inconsistent anchor, or uneven shoulder height — creates an off-axis force component on the arrow during launch. Even a 1-degree angular error at 70 meters results in a significant lateral miss. This is why elite archers obsess over millimeter-level consistency in their setup.
Grip Force and Torque
The bow grip is perhaps the most sensitive point of force transmission in the entire system. The bow exerts a rearward force on the grip hand during the draw and a forward force at the shot. Any rotational grip force (torque) twists the bow laterally as it fires.
Zero-Torque Grip Biomechanics
- • The bow should rest in the meaty part of the thumb base (thenar eminence) — not in the fingers
- • Finger contact should be light and consistent — fingertips barely touching the riser sides
- • The bow hand wrist should be rotated outward (bow elbow down and away from string) to prevent string slap
- • Using a wrist sling allows complete hand relaxation — the sling catches the bow after the shot
- • A consistent, light grip should feel identical every shot — pressure at the same point, same relaxation level
🔄 The Shot Cycle: A Biomechanical Map
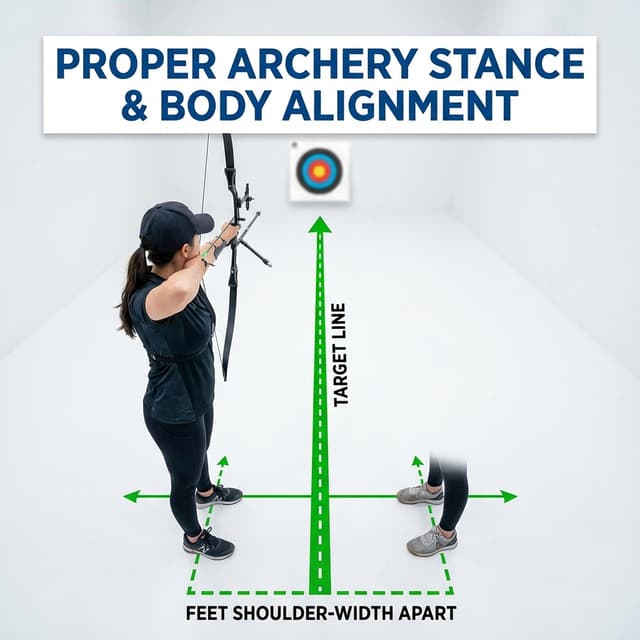
1. Setup and Stance
Weight evenly distributed between feet; hip-width stance. Core muscles lightly engaged. Shoulder girdle depressed (both shoulders down, not shrugged). This neutral position is the foundation from which all draw mechanics flow.
2. Set and Pre-Draw
Bow raised to target level. Both scapulae set in their starting positions: bow arm shoulder pressed forward and down into the socket; draw arm shoulder slightly elevated and forward in preparation for retraction. The draw fingers are lightly hooked on the string.
3. Draw
Back muscles initiate the movement. The draw elbow moves back and slightly upward in a smooth arc. The shoulder blade begins its journey toward the spine. The arm is a rigid link; the shoulder blade is the engine. Draw speed should be controlled and consistent — not rushed or hesitant.
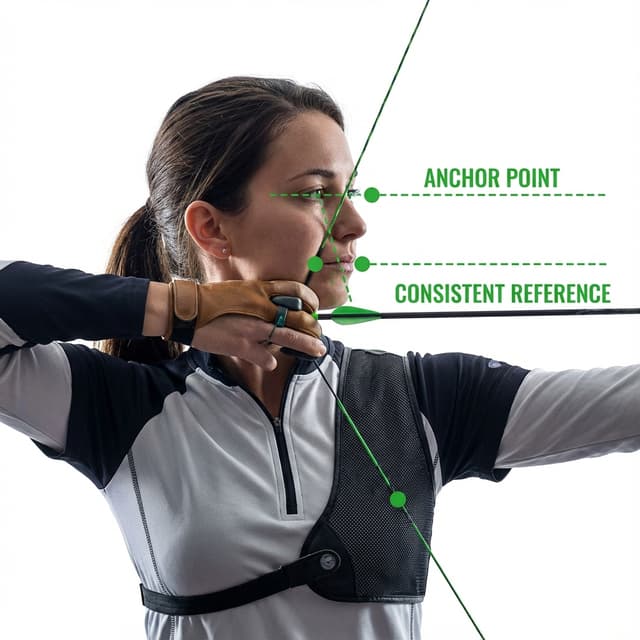
4. Anchor
The draw hand reaches its reference point on the face. Multiple anchor contact points (string to nose, hand to jaw, peep sight alignment) provide a redundant positioning system. The shoulder blade is retracted but not yet fully contracted — there is still movement available. Back tension continues to build.
5. Aim and Expansion
The archer aligns the sight with the target while continuing to apply back tension. The shoulder blade continues its slow retraction. This is "expansion" — the archer is not holding static but continuing to press forward with the bow arm and draw back with the shoulder. The bow is a spring being continuously loaded.
6. Release
The clicker falls or the bow hits its wall; back tension has loaded the system to the release point. The string fingers relax — they do not flick open. On a release aid, back tension drives the hand far enough back to trigger the device. The release is a consequence of mechanics, not a conscious decision.
7. Follow-Through
The draw hand continues moving backward naturally (toward the neck or behind the ear) as the back muscles complete their contraction. The bow arm holds toward the target. The archer maintains focus until the arrow impacts. Follow-through is proof that the release was genuine — not a deliberate opening of the hand.
🛡️ Archery Injury Prevention Through Biomechanics
Most archery injuries are overuse injuries caused by poor biomechanics repeated thousands of times. The good news: correct form is not just more accurate — it is dramatically less injurious.
Common Archery Injuries
- • Rotator cuff tendinopathy — overloading shoulder muscles with improper draw
- • Medial epicondylitis (golfer's elbow) — excessive forearm flexor use on draw hand
- • Lateral epicondylitis (tennis elbow) — wrist extensor overuse on bow arm
- • String arm bruising — bow arm elbow not rotated correctly; in string path
- • Shoulder impingement — drawing with shoulder elevated rather than depressed
Prevention Through Correct Mechanics
- • Keep shoulder blades depressed throughout the shot cycle
- • Draw with back muscles, not arm muscles — reduces shoulder joint load
- • Rotate bow arm elbow away from the string path — prevents string slap
- • Use appropriate draw weight — overbow is the top cause of archery injury
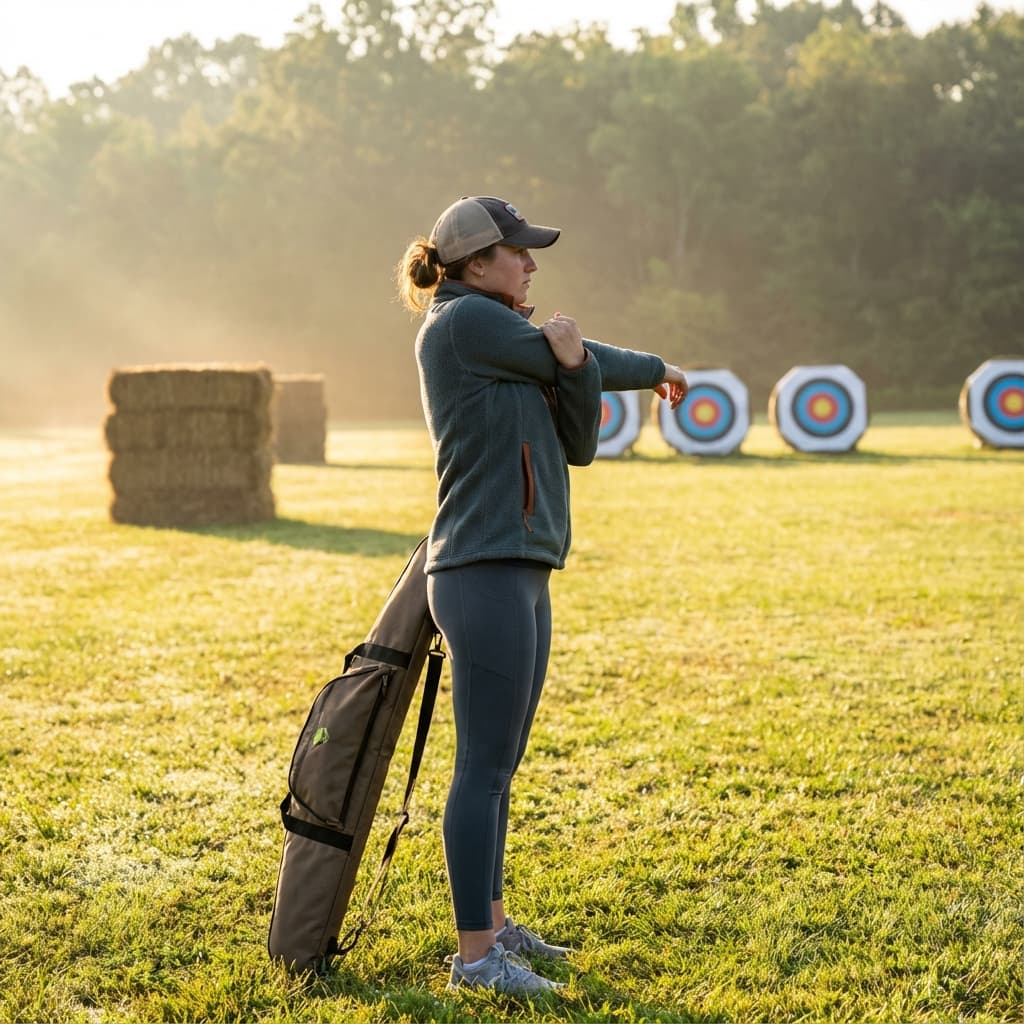
- • Warm up properly before shooting — see our warm-up routine guide
If an archery motion consistently hurts, your technique is wrong, your draw weight is too heavy, or both. Never shoot through pain. Pain is the body's damage-prevention signal. Most archery injuries that become chronic started as minor discomfort that was ignored. Reduce draw weight, fix form, or both — then build back up progressively.
🎯 Applying Biomechanics to Your Practice
Understanding archery biomechanics is only valuable if it changes how you practice. Here are evidence-based ways to apply this science to your training sessions.
Practical Biomechanics Drills
Blank Bale Draw Drill
Stand at arm's length from a target. Draw and release (eyes optionally closed) focusing entirely on feeling the rhomboids engage and the shoulder blade retract. No aiming. This isolates the back tension sensation without the distraction of the target.
Resistance Band Scapular Retraction
Off the range, use a resistance band to practice isolated scapular retraction — the exact movement that drives back tension. This builds the neuromuscular connection between your brain and the rhomboids so it is automatic when you pick up the bow.
Video Self-Analysis
Film yourself from behind and the side at full draw. Assess shoulder height, T-shape alignment, elbow position, and bow arm alignment against the biomechanical standards in this guide. What you think you are doing and what you are actually doing are often different.
Draw Weight Calibration
Shoot your current setup and honestly assess: are you maintaining T-shape alignment and back muscle dominance throughout the draw? If form breaks down consistently, your draw weight is too heavy for your current strength level. See our draw weight guide for how to choose the right starting weight.
📌 Archery Biomechanics Key Principles
- Back muscles (rhomboids, trapezius, lats) drive the draw — arms are structural connectors
- Bone alignment transfers load to the skeleton, reducing muscular fatigue and inconsistency
- The T-shape at full draw maximizes back muscle mechanical advantage
- Back tension release eliminates anticipatory finger action that destroys consistency
- Grip torque is the most common cause of lateral arrow deviation — use a relaxed, consistent grip
- Continue expanding through the shot — never become static after reaching anchor
- Most archery injuries are prevented by correct form plus appropriate draw weight
- Biomechanical improvement requires video analysis and deliberate practice — not just more arrows
The archer who understands the science of their shot has a permanent advantage over one who relies only on feel and repetition. When something goes wrong, they can diagnose it systematically. When something goes right, they can replicate it deliberately. Archery biomechanics is not just academic knowledge — it is the framework that turns practice time into real, measurable improvement.
Analyze Your Form with ArcheryBuddy
ArcheryBuddy's AI-powered form analysis reviews your shooting video and identifies biomechanical issues — shoulder position, T-shape alignment, draw arm elbow, follow-through, and more. Put the science of archery biomechanics to work on your specific technique.
📚 Related Articles
Archery Exercises & Strength Training
Build the specific muscles that biomechanics demands
Common Form Mistakes
Biomechanical errors that every archer makes
Archery Warm-Up Routine
Prepare your muscles for the biomechanical demands of archery
How to Aim in Archery
Aiming is the final step after biomechanics are correct