The archery release is the most critical — and most misunderstood — moment in a shot. Everything you do before release is preparation; the release itself determines whether an arrow flies true or drifts wide. A poor bow release technique can undo perfect stance, anchor, and aim in a fraction of a second. This guide covers finger releases, mechanical release aids, the concept of back tension, the surprise release, common errors, and drills to build a consistently clean release every time you shoot.
🎯 The Golden Rule of Archery Release
A perfect release is one that surprises you. If you know exactly when the arrow will fire — whether that is because you are consciously letting go with your fingers or deliberately triggering a release aid — you will unconsciously anticipate and flinch. The goal of every release technique is to make the shot happen as a result of process, not as a deliberate action.
This concept, known as the surprise release, is the foundation of elite archery technique in both recurve and compound disciplines.
🤚 Finger Release vs Mechanical Release Aid
The first question is which type of release method applies to your setup. This is largely determined by your bow type, but understanding both gives you a fuller picture of release technique.
Finger Release (Recurve / Traditional)
The string is drawn and released using the fingers, protected by a finger tab or shooting glove. The Mediterranean draw — index finger above the nock, middle and ring finger below — is standard in Olympic recurve. Three-finger under (split-finger or three-under) is common in traditional archery.
How It Works:
- • The fingers relax and open rather than actively pulling back
- • The back muscles contract, pulling the elbow back and allowing the fingers to open
- • String slides off the fingers as tension releases
- • The draw hand travels back along the face in follow-through
Mechanical Release Aid (Compound)
A mechanical device hooks onto the D-loop or string and fires when a trigger is activated. It eliminates finger torque on the string, providing higher consistency and accuracy. Compound archers almost universally use a release aid.
Main Types:
- • Wrist strap (index trigger): Most popular; held in palm with index finger on trigger
- • Handheld thumb release: Held like a pen; thumb activates trigger
- • Handheld back tension (hinge): Fires from back tension with no trigger
- • Resistance activated: Fires when back tension reaches set resistance
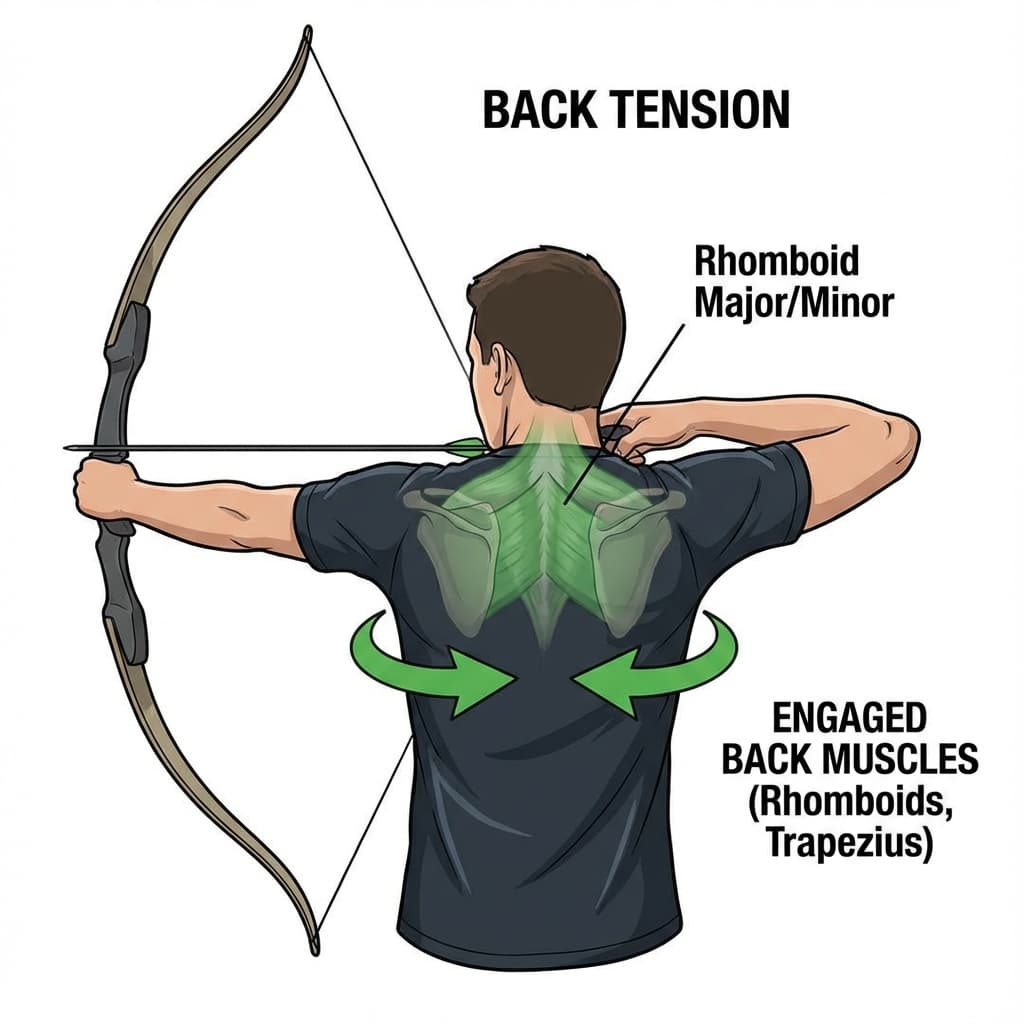
💪 Back Tension: The Foundation of Every Clean Release
Back tension is the driving force behind a correct release, regardless of whether you shoot fingers or a mechanical aid. Without back tension, archers rely on hand and arm muscles to execute the shot — which leads to anticipation, punching the trigger, and plucking the string.
What Back Tension Actually Is
Back tension is not just pulling your elbow back. It is the activation of the rhomboids and mid-trapezius muscles — the muscles between your shoulder blades on the draw side. When these muscles engage and continue to contract through the shot, the elbow naturally moves back, the hand position changes, and the shot fires naturally.
The Scapula Rotation Exercise
Stand with your arms at your sides. Without shrugging, squeeze your shoulder blades together and slightly downward. You should feel your draw-side shoulder roll back and down. That is the back tension movement. Now replicate it at full draw: your draw elbow naturally moves back, your hand relaxes, and the shot happens. Practice this without a bow 10 times before every session.
Back Tension for Finger Shooters
For recurve archers, the sequence is: reach full draw → set anchor → align sight → begin back tension contraction → as scapula squeezes, finger muscles relax passively → string rolls off fingers → shot fires. The fingers do not actively open. They relax as a consequence of the back muscles taking over. This is why top Olympic archers often describe feeling like they did not shoot — the bow went off on its own.
Back Tension for Compound Shooters
For compound archers with a trigger release aid, back tension removes the tendency to punch(consciously jabbing the trigger before full commitment). With a back tension hinge release, there is no trigger — the release fires when the draw hand rotation reaches the threshold. With an index or thumb trigger, the back tension method means you push into the trigger as a result of back tension, not as a conscious command. The shot should still surprise you.
⚡ The Surprise Release: How to Achieve It
The surprise release is the execution model used by virtually every elite archer. The idea: if you cannot predict exactly when the shot will fire, you cannot anticipate it. If you cannot anticipate it, you cannot flinch before the arrow leaves the bow.
Step 1: Commit to the process, not the shot
Focus entirely on the back tension contraction and proper form execution. Do not think "I am going to shoot now." Think "I am continuing to squeeze." The shot is an outcome, not an intention.
Step 2: Build up slowly with blank bale practice
Shoot at a blank target from 2–5 feet. Close your eyes (safely). Draw, set your anchor, apply back tension, and let the shot happen. With your eyes closed, you cannot anticipate because you have nothing to aim at. Focus purely on the sensation of back tension driving the shot.
Step 3: Transfer to open-eye shooting
Once the muscle memory of back-tension release is established, open your eyes but maintain the same process. The sight picture becomes something you observe while the back tension process continues, rather than something you react to by firing.
Step 4: Use the shot timer method (compound)
Set a countdown timer for a random interval between 4–8 seconds. Draw, aim, begin back tension. Force yourself to wait until the timer fires before releasing (the timer fires unpredictably). This teaches your brain to sustain process rather than rush to the shot.
⚠️ Common Release Errors and How to Fix Them
Plucking the String (Finger Archers)
The draw hand moves sideways or outward during release rather than straight back. Caused by actively opening the fingers outward or pulling the hand away from the face. Results in sideways arrow drift — groups that shift left or right inconsistently.
Fix: Practice blank bale shooting focusing on the draw hand traveling back and inward along the face. The hand should finish near your neck or ear. Use a mirror or video to check.
Punching the Trigger (Compound Archers)
Consciously stabbing the trigger before reaching full back tension and mental commitment. Often accompanied by dropping the bow arm. A major cause of target panic. Groups scatter everywhere.
Fix: Switch to a back tension (hinge) release for 2–4 weeks. With no trigger to punch, the habit breaks. Then carefully reintroduce a trigger release with a strict back-tension process.
Creeping Forward at Release
The draw hand moves forward (toward the bow) at the moment of release rather than continuing backward. Reduces effective draw length and arrow speed. Results in low shots and inconsistent groups.
Fix: Focus on back tension continuing through the shot. After release, your draw hand should be further back than where it started — not forward. Check with video at the moment of release.
Collapsing at Full Draw
The draw arm "collapses" — the elbow drops and draw length shortens during aiming. Usually caused by using too heavy a draw weight or from muscle fatigue. Creates massive inconsistency.
Fix: Reduce draw weight temporarily. Build archery-specific back and shoulder strength with band exercises. See our archery strength training guide.
Dropping the Bow Arm
The bow arm drops just before or during release — anticipating the shot. Results in arrows hitting low. One of the most common beginner mistakes.
Fix: Focus on follow-through. Your bow arm should hold its position until the arrow hits the target. Practice "staying on target" for a full 2-count after each shot. See our common form mistakes guide.
🎯 Release Technique Drills That Actually Work
Blank Bale Drill (All Archers)
Shoot at a target from 2–5 feet. No target face, just a blank surface. Focus entirely on back tension and release quality. No score, no pressure. This removes the aiming variable completely and lets you focus on the release alone. Elite archers spend 15–20% of their practice time on blank bale even at the highest levels.
Resistance Band Release Practice (All Archers)
Use a resistance band at draw weight. Draw and hold the band in your shooting position. Practice the back tension squeeze and release movement without an actual bow. The advantage: you can do this anywhere, any time, and repeat hundreds of times to build muscle memory. Also excellent for building archery-specific strength.
Eyes-Closed Release (Finger Archers)
At a close blank bale (safely): draw, anchor, close your eyes, and fire using only back tension. This removes all visual distraction. You cannot anticipate a shot you cannot see. Once the release happens, open your eyes and note where you hit and what you felt. The ideal shot feels like it happened without your involvement.
The "Let Down" Drill (Anti-Punch, Compound)
Draw, aim, and then let down without shooting. Slowly release tension and return to brace height. Repeat. This rewires the brain to understand that every draw does not have to end in a shot. It eliminates the compulsion to fire immediately at full draw — the root of trigger punching and target panic. Alternate let-downs with actual shots unpredictably.
Video Slow-Motion Review
Film your shots from the side and behind at 120+ fps slow motion. Review the release frame by frame. Does the draw hand move backward (correct) or outward/forward (incorrect)? Does the bow arm hold position through the shot? Does the bow shoulder stay down? Video is the most honest feedback tool in archery — your perception of your own shot rarely matches reality.
🏹 Follow-Through: The Release Does Not End at Release
The follow-through is what happens after the arrow leaves the bow — and it matters enormously. Poor follow-through is usually a symptom of release errors. Good follow-through confirms that the release was correct.
Correct Follow-Through (Recurve)
- • Draw hand travels back and slightly down to shoulder level
- • Draw elbow points behind you at 90° or more
- • Bow arm holds its position, possibly with gentle natural torque
- • Head stays still, eyes on target
- • Body weight remains balanced on both feet
Correct Follow-Through (Compound)
- • Release hand snaps back toward the ear or shoulder
- • Bow arm maintains elevation — does not drop
- • Bow rotates forward in the hand (sling catches it)
- • Eyes stay on the target through impact
- • Body stays relaxed — no jumping or flinching
Analyse Your Release with AI
ArcheryBuddy's AI analyses your form including release and follow-through mechanics, giving you frame-by-frame feedback on exactly where your technique breaks down. Download free on iOS and Android.