Knowing how to aim in archery is what separates archers who hit the gold from those who scatter arrows across the target. But aiming is not just "point and shoot" — there are multiple archery aiming techniques, each suited to different bow types, disciplines, and skill levels. This guide covers every major aiming method, from gap shooting to using a multi-pin sight, so you can find the archery sight picture that works best for your setup.
🎯 The Five Main Archery Aiming Techniques
Before we dive deep into each method, here is a quick overview of the five primary ways archers aim. Your choice depends on your equipment, discipline, and personal preference.
Compound & recurve with sights
Barebow & traditional
Traditional & 3D
Competitive barebow
Less common barebow
📏 Gap Shooting: The Fundamental Barebow Technique
Gap shooting is the most systematic archery aiming technique for archers without a sight. It uses the arrow tip as a reference point and the "gap" — the visual distance between the tip and the target — to calculate trajectory.
How Gap Shooting Works
- 1. Find your point-on distance — This is the distance where your arrow tip sits exactly on the gold when your anchor is correct and the arrow hits center. For most recurve setups, this is typically 30-50 yards.
- 2. Closer than point-on — Your arrow tip will appear below the target center. The "gap" is how far below. At very close range (5-10 yards), the gap can be quite large.
- 3. Farther than point-on — Your arrow tip will appear above the target center. You aim with the tip above the gold.
- 4. Build a gap chart — Through practice, you learn the exact gap for every distance. At 10 yards, tip is 12 inches below gold. At 20 yards, tip is 6 inches below. At 35 yards, tip is on the gold. And so on.
Pro Tip: Building Your Gap Chart
Shoot 6-arrow groups at every 5-yard increment from 5 to 50 yards. At each distance, note where you need to place your arrow tip (relative to the target center) to hit gold. Write it down. Over a few sessions, you will have a complete gap chart that becomes your aiming reference. Some archers tape this chart inside their quiver for field rounds.
Best for: Barebow archers who want a systematic, repeatable aiming method. Gap shooting is the most popular technique in competitive barebow and is easier to learn than instinctive aiming while being more precise at known distances.
📌 Using a Sight: Pin Aiming for Compound and Olympic Recurve
Sights are the most precise aiming method available. They remove much of the guesswork by giving you a clear visual reference to align with the target. Understanding your archery sight picture is key to using a sight effectively.
Types of Sights
Single-Pin Movable Sight
One pin that you adjust for each distance. Used in Olympic recurve (with a ring, not a pin) and some compound setups. Advantage: clean sight picture with no pin clutter. Disadvantage: requires adjustment between distances.
Multi-Pin Fixed Sight
Three to seven pins, each set for a different distance (e.g., 20, 30, 40, 50, 60 yards). Common in 3D and hunting compound setups. Advantage: fast at any distance. Disadvantage: more pins mean more visual clutter.
Hybrid Slider Sight
A single pin on a sliding track with a yardage tape. Dial to your distance and shoot. Popular in target compound archery. Combines the clean sight picture of a single pin with the versatility of multiple distances.
How to Aim with a Sight
- 1. Center the pin — Place the correct distance pin on the center of the target (or where you want to hit).
- 2. For compound: align through your peep — The sight housing should be perfectly centered inside your peep sight, creating concentric circles.
- 3. Let the pin float — Your pin will never be perfectly still. It will drift in a small pattern around the center. This is normal. Do not chase it.
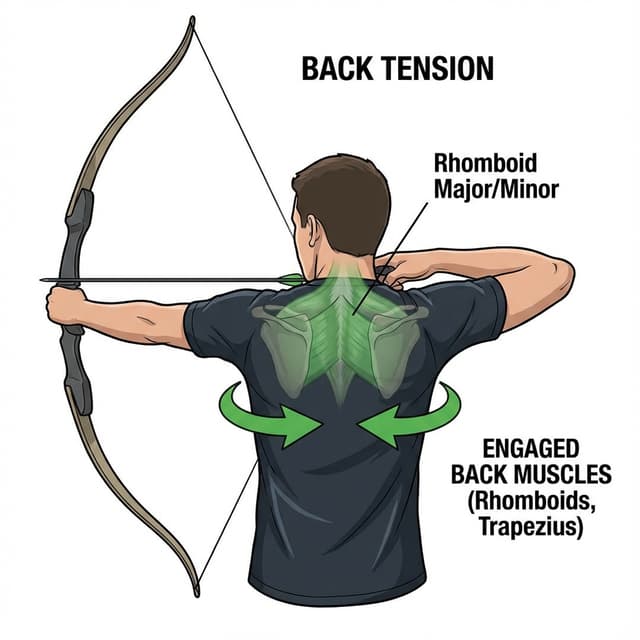
- 4. Execute during the float — Continue your back tension and let the release happen while the pin floats over the target. Trying to time the release to pin position causes target panic.
- 5. Focus on the target, not the pin — Your eye should be focused on the X-ring. The pin should be slightly blurry in your peripheral vision. This is counterintuitive but produces better accuracy.
⚠️ Warning: The Float is Your Friend
New archers often try to hold the pin perfectly still on the gold and fire the instant it crosses center. This leads to punching the trigger and eventually to target panic — a debilitating condition where you cannot release the arrow when the pin is on target. Accept the float. Trust your subconscious. Fire through the float with steady back tension.
🧠 Instinctive Aiming: The Natural Method
Instinctive aiming is how to aim in archery without any conscious reference system. You look at the target, draw, and release. Your brain calculates the trajectory based on thousands of repetitions, just like throwing a ball or shooting a basketball.
How Instinctive Aiming Works
- • Focus intensely on the spot you want to hit — not the target face, not the ring, but a specific tiny spot.
- • Do not look at the arrow tip or any reference point. Your eyes stay locked on the target.
- • Draw and anchor with your normal consistent form.
- • Release when it feels right — your subconscious mind processes distance, angle, and wind and tells your body when to let go.
- • Requires massive volume — most instinctive archers shoot thousands of arrows before the method becomes reliable.
Advantages
- • Fastest aiming method — no time calculating gaps
- • Works at unknown distances
- • Feels natural and meditative
- • Excellent for hunting and 3D
Disadvantages
- • Takes the longest to develop
- • Less precise than sight or gap shooting
- • Degrades faster with breaks in practice
- • Difficult to diagnose aiming errors
🚶 String Walking: The Competitive Barebow Secret
String walking is an advanced archery aiming technique used by competitive barebow archers. It lets you aim with the arrow tip directly on the target at every distance by changing where your fingers grip the string.
How String Walking Works
- 1. Standard position — Fingers directly under the nock (zero crawl). This gives you your maximum trajectory and is used for the longest distances.
- 2. Crawl down the string — For closer distances, move your fingers down the string away from the nock. Each finger-width of crawl lowers the arrow trajectory.
- 3. Arrow tip on target — Because you are changing the nock-to-finger distance, you can always place the arrow tip on the gold. The crawl distance controls the arc.
- 4. Build a crawl chart — Mark your tab or memorize the number of string servings between the nock and your fingers for each distance.
Pro Tip: Tab Markings
Most competitive barebow archers mark their finger tab with lines that correspond to specific distances. The tab edge sits at a specific mark on the string serving, giving you a precise and repeatable crawl for every distance. This turns string walking from guesswork into science. Combined with a solid gap chart as backup, you have a robust aiming system for any situation.
📐 Aiming Adjustments for Different Distances
Regardless of your aiming method, you need to understand how distance affects your aim. Arrows travel in an arc, not a straight line, and this arc changes significantly across typical archery distances.
Distance Considerations
Close Range (5-15 yards)
The arrow is still rising. Barebow archers need large gaps (aim low). Sight users need their closest pin. Arrow speed matters less here — form is everything.
Mid Range (20-40 yards)
The sweet spot for most setups. The arrow arc is manageable, pin gaps are moderate, and small form errors are somewhat forgiving. This is where most practice and competition shooting happens.
Long Range (50-70+ yards)
The arrow is falling fast. Tiny aiming errors are magnified dramatically. Wind becomes a major factor. Your pin or gap adjustments at these distances are much more sensitive — a small change equals a big target shift.
💨 Windage Adjustments: Aiming in the Wind
Wind is the outdoor archer's greatest challenge. Understanding how wind affects your aim is essential for how to aim in archery outside of a controlled indoor range.
Crosswind (Left/Right)
Pushes the arrow sideways during flight. The correction is to aim upwind — if the wind blows left to right, aim left of center. The amount depends on wind speed and arrow flight time. Lighter, slower arrows are affected more.
Headwind
Slows the arrow and causes it to drop more. Aim slightly higher than normal or move your sight down slightly. The effect is usually small unless the wind is very strong.
Tailwind
Pushes the arrow faster and flatter, causing it to hit high. Aim slightly lower or move your sight up. Again, the effect is usually modest compared to crosswind drift.
Quartering Wind
The most common real-world wind condition. Has both horizontal and vertical components. Split the difference — adjust both left/right and up/down based on the dominant wind direction.
Pro Tip: Read the Flags and Grass
Watch the range flags (if available), tall grass, or leaves between you and the target. Wind at the target may be different from wind at your position. Many experienced archers attach a small yarn flag to their bow or stabilizer to monitor wind shifts in real time. The best wind readers in archery treat it like a game — constantly gathering data and adjusting before each shot.
🏋️ Practice Drills to Improve Your Aiming
Drill 1: Dot Drill (Precision Focus)
Place 5 small dots (1-inch diameter) on a blank target face. Shoot one arrow at each dot. This forces precise aiming and prevents the habit of "aiming at the whole target." Score yourself based on distance from dot center.
Drill 2: Distance Ladder
Shoot 3 arrows at 10 yards, 3 at 20, 3 at 30, 3 at 40. Then come back down: 30, 20, 10. This trains your brain to adjust aiming quickly between distances — essential for field archery and 3D competitions.
Drill 3: Float Acceptance (Sight Users)
Deliberately watch your pin float for 8-10 seconds without releasing. Notice the float pattern. Then close your eyes and execute through back tension. This trains you to trust the float and prevent target panic.
Drill 4: Blind Bale Gap Reference
For barebow archers: shoot at a blank bale at various distances, focusing only on where your arrow tip naturally points. Document the arrow tip position at each distance without any target face to eliminate result anxiety.
Drill 5: Wind Practice
Deliberately practice on windy days. Keep a log of wind speed, direction, and your corrections. Over time, you will develop an intuition for windage that makes outdoor shooting far less stressful.
Choosing between bow types affects your aiming options significantly. Our compound vs recurve comparison breaks down the differences to help you pick the right platform.
Track Your Aiming Progress
Use ArcheryBuddy to log your scores at every distance, track grouping sizes over time, and get AI-powered form feedback to identify what is affecting your aim.
✅ Key Takeaways
- ✓Gap shooting is the best starting method for barebow — systematic, repeatable, and learnable
- ✓Sight aiming is the most precise — let the pin float, do not chase the gold
- ✓Instinctive aiming is the most natural but requires the most practice volume
- ✓String walking is the competitive barebow standard — arrow tip always on target
- ✓Wind adjustments are critical outdoors — learn to read conditions constantly
- ✓Practice specific aiming drills, not just volume — dot drills and distance ladders build real skill
Understanding how to aim in archery is essential, but aiming only works when built on solid form. For the complete accuracy picture, read our archery accuracy improvement guide.