Your archery stance is the foundation of every shot you take. A solid, repeatable stance eliminates variables before you even touch the string, making it the easiest and most impactful way to improve your scores. This guide covers every aspect of archery foot position and archery body alignment, from the three main stance types to drills that will lock in muscle memory for years to come.
🎯 Why Your Archery Stance Matters More Than You Think
Think of your body as a platform for launching arrows. If that platform shifts, tilts, or rotates differently from shot to shot, your arrows will land in different places — even if your upper body form is perfect. A consistent archery stance provides:
A balanced base prevents swaying and tipping, especially at full draw when forces act on your body
When your feet are in the same place every time, your entire kinetic chain follows the same path
The right stance minimizes your profile to crosswinds, reducing drift in outdoor competition
Professional archers spend significant time perfecting their stance because they understand that a one-degree rotation at the feet creates a multi-inch shift at 70 meters. The good news is that archery foot position is one of the simplest things to fix and drill — it just requires awareness and practice.
🦶 The Three Main Archery Stances
There are three primary stances used in archery. Each has advantages and trade-offs, and the best one for you depends on your body type, bow style, and discipline. Let us break down each one in detail.
1. Square Stance (Neutral Stance)
How to Set Up
- • Place both feet parallel to the shooting line, shoulder-width apart.
- • Your toes form a straight line pointing directly at the target.
- • Weight distributed evenly between both feet.
- • Hips and shoulders are naturally aligned perpendicular to the target line.
Advantages
- • Easiest to set up and replicate
- • Natural body alignment
- • Great for beginners learning basics
- • Simple reference against the shooting line
Disadvantages
- • Less stable in wind
- • Can restrict chest clearance
- • Body may rotate during draw
- • Limited back engagement potential
Best for: Complete beginners, indoor shooting at short distances, and archers who have no string clearance issues. The square stance is the default starting point before experimenting with other positions.
2. Open Stance
How to Set Up
- • Start from the square stance position.
- • Rotate your front foot (closest to the target) 25-45 degrees toward the target.
- • Your front foot's toe now points slightly toward the target face.
- • Keep your back foot in its original position or turn it slightly as well.
- • Your hips will naturally open toward the target.
Advantages
- • Better string clearance for chest and arm
- • More stable in crosswinds
- • Opens the chest for easier breathing
- • Naturally limits over-rotation
- • Used by most Olympic recurve archers
Disadvantages
- • Requires more core strength to maintain
- • Can cause hip alignment issues if overdone
- • Takes practice to find the right rotation angle
Pro Tip: The Degree of Openness
The exact angle of your open stance is personal. Start at 25 degrees and increase gradually. If you go too far open (past 45 degrees), you will find it difficult to use your back muscles effectively and may introduce a torso twist. Film yourself from above or have a coach check your alignment. The archery body alignment sweet spot is where your shoulders can line up with the target while your hips stay naturally placed.
3. Closed Stance
How to Set Up
- • Start from the square stance position.
- • Move your front foot slightly away from the target (back from the shooting line).
- • Your body line now angles away from the target, and your chest faces slightly more toward your bow arm side.
- • The back foot remains at the shooting line or steps slightly forward.
Advantages
- • Increases draw length slightly
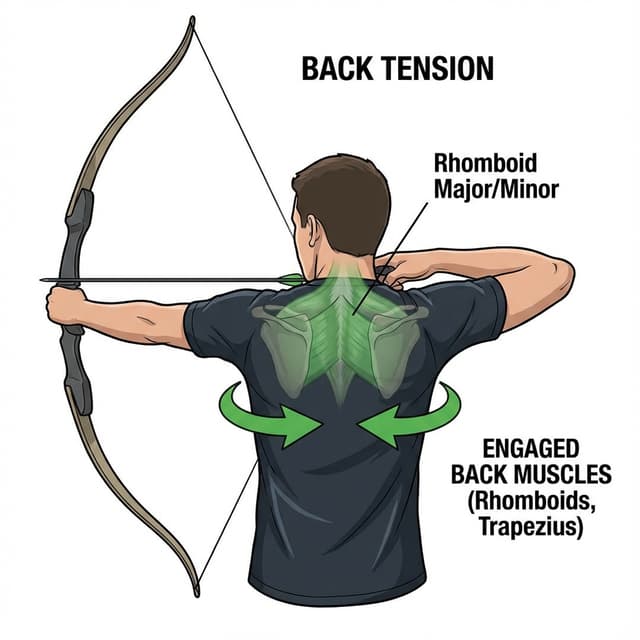
- • Can increase back tension engagement
- • Some archers find it more powerful
Disadvantages
- • Higher risk of string hitting arm or chest
- • Less stable than open stance
- • Can cause over-rotation at full draw
- • Rarely used in modern competitive archery
⚠️ Caution
The closed stance is rarely recommended for beginners or intermediate archers. It increases the risk of string slap and can create alignment problems that are difficult to diagnose. Most coaches will steer you toward a square or open stance unless you have a specific biomechanical reason for a closed position.
🏆 Which Archery Stance Is Best for You?
The short answer: the open stance is the most popular and widely recommended stance for a reason. It offers the best combination of stability, clearance, and repeatability. But the right stance for you depends on several factors:
Body Type
Broader-chested archers almost always need an open stance for string clearance. Slimmer archers may find a square stance works fine.
Bow Type
Recurve archers benefit more from an open stance due to the string path. Compound archers with short axle-to-axle bows may prefer a slightly open or square stance.
Discipline
Outdoor archers shooting in wind should lean toward an open stance for stability. Indoor archers at 18 meters can often use whichever stance feels most natural.
Physical Limitations
Knee, hip, or back issues may make certain stances uncomfortable. Always choose a stance that you can hold without pain for an entire competition round.
Not sure which bow suits your style? Read our compound vs recurve comparison for a detailed breakdown.
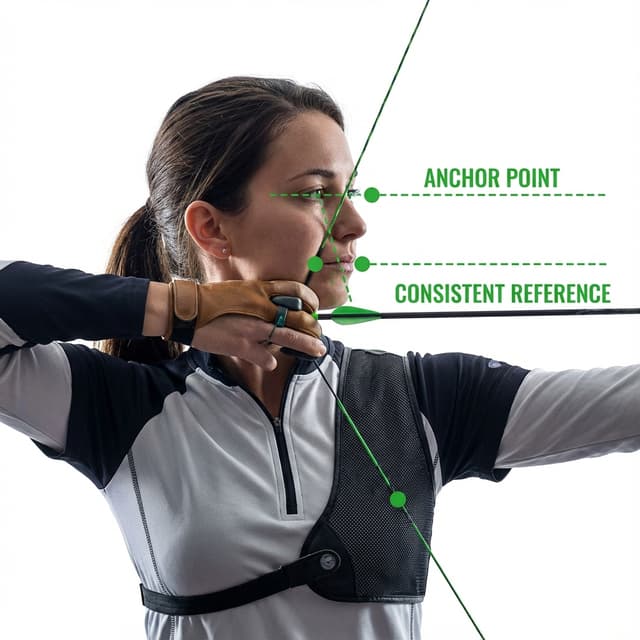
🧍 Upper Body Alignment: Completing the Picture
Your archery body alignment does not stop at your feet. The entire kinetic chain — from feet through hips, torso, shoulders, and head — must work together. Here is how each segment should be positioned:
⚠️ Common Archery Stance Mistakes
❌ Feet Too Close Together
Creates an unstable base. You will sway at full draw, especially in wind. Keep feet at least shoulder-width apart.
❌ Feet Too Wide
Overly wide stances lock your hips and reduce mobility. You lose the ability to make fine torso adjustments.
❌ Leaning Away from the Target
Common with heavy draw weights. Archers lean back to compensate, which collapses the bow shoulder and ruins alignment.
❌ Inconsistent Foot Placement
Placing feet differently each end creates different shot geometries. Use a marker or tape on the ground during practice.
❌ Weight on the Heels
Shifts your center of gravity backward. You should feel pressure on the balls of your feet, as if ready to take a step forward.
❌ Locked Knees
Causes premature fatigue, reduced blood flow, and can even lead to fainting during long tournament rounds. Keep a slight bend.
These mistakes overlap with many of the issues covered in our top 10 form mistakes beginners make.
🏋️ Drills to Improve Your Archery Stance
These drills build muscle memory for your stance so it becomes automatic. Practice them at home — you do not even need a bow for most of them.
Drill 1: Tape Line Setup (5 min daily)
Place tape on the floor to simulate a shooting line. Practice stepping up to the line and setting your feet into your chosen stance 20 times. Close your eyes, set your feet, then open your eyes to check placement.
Drill 2: Balance Hold (3 sets of 30 seconds)
Set your stance and close your eyes. Hold the position for 30 seconds without swaying. If you sway, your stance is too narrow or your weight distribution is off. This builds proprioception.
Drill 3: Wall Alignment Check
Stand in your stance with your back near a wall. Your head, upper back, and hips should all be close to the wall surface. If your head juts forward or your lower back arches excessively, adjust your alignment.
Drill 4: Single-Leg Stability
Stand on one foot for 30 seconds, then switch. This strengthens the stabilizer muscles in your ankles and hips that maintain your stance during a shot. Do 3 sets per leg.
Drill 5: Draw and Hold with Focus on Feet
With your bow (or a stretch band), draw to anchor and hold for 10 seconds while actively thinking about your feet. Are they still in position? Has your weight shifted? This trains awareness under load.
Pro Tip: Use Foot Markers in Competition
In most competitions, you are allowed to place small markers on the ground to ensure consistent foot placement. Use small pieces of tape or draw marks with chalk. This is not cheating — it is smart archery. Most top-level archers do this. Combined with a solid pre-shot routine, your stance becomes completely automatic.
🌤️ Adjusting Your Stance for Different Conditions
Windy Conditions
Widen your stance slightly (2-3 inches beyond shoulder width) and deepen your open stance angle. Bend your knees a fraction more. This lowers your center of gravity and increases your resistance to being pushed off balance.
Uneven Terrain (Field Archery)
On hillsides, keep your weight on the uphill foot. Adjust your foot angle so your hips stay level. You may need to widen or narrow your stance depending on the slope angle. Practice on uneven ground before competing in field rounds.
Long Tournament Days
Fatigue causes stance degradation. During breaks, stretch your calves and hip flexors. Consider slightly softer knees as the day progresses. Stay hydrated — dehydration causes muscle fatigue that shows up in your stance first.
Perfect Your Stance with AI Feedback
ArcheryBuddy uses AI form analysis to check your stance, alignment, and body position from video. Get instant feedback on what to adjust and track your form improvements over time.
✅ Key Takeaways
- ✓The open stance is the most versatile and widely recommended for most archers
- ✓Feet shoulder-width apart, weight on the balls of your feet, knees slightly soft
- ✓Upper body alignment (hips, torso, shoulders, head) is just as important as foot position
- ✓Use tape markers and drills to build stance consistency into muscle memory
- ✓Adjust your stance for wind, terrain, and fatigue — but keep the fundamentals constant
- ✓Film yourself to catch stance drift you cannot feel
A solid archery stance is the cheapest, easiest upgrade you can make to your shooting. Spend 5 minutes each day on stance drills and you will see tighter groups within weeks. Ready to improve the rest of your form? Read our complete archery accuracy guide for the full picture.