The way you hold your bow — your archery grip — has a bigger impact on accuracy than most archers realize. A bad grip introduces torque (unwanted rotation) into the bow at the moment of release, scattering arrows unpredictably. Yet most beginners are never taught proper grip technique. This comprehensive guide covers low wrist vs high wrist grip, the correct pressure point, how to eliminate torque, the finger sling method, and the most common grip errors and how to fix them.
⚡ The Core Principle
A correct bow grip is a non-grip. The bow should rest against the pressure point of your thumb pad — never gripped, squeezed, or held. Your fingers should be relaxed and open (or loosely curled). The moment you grab the bow, you introduce torque. The bow is held by the draw force, not by your hand.
✋ The Bow Hand: Anatomy of a Good Grip
Before understanding grip styles, you need to know the specific contact point that matters. The bow pressure point is the fleshy pad at the base of your thumb — the thenar eminence — located on the inside of your palm just below the thumb joint. This single point of contact is where the bow should push.
Identifying Your Pressure Point
- Hold your hand out flat, palm facing up
- Press your thumb toward your palm — the fleshy mound that pops up is the thenar eminence
- This is the only part of your hand that should contact the bow grip
- The lifeline of your palm, your fingers, and the web between thumb and index finger should NOT press against the bow
When the bow pushes back against this specific point — and only this point — the bow face (the side facing the target) remains perpendicular to the ground through the shot. The moment other parts of your hand contact the grip and apply pressure, the bow rotates on its vertical axis, sending arrows left or right unpredictably.
🔄 Low Wrist vs High Wrist Grip
The two primary bow grip styles differ primarily in wrist position and the amount of hand surface in contact with the bow. Both can be correct — what matters is consistency and the elimination of torque.
Low Wrist Grip
Most common in Olympic recurve archery
The wrist is pushed down and forward, so the bow grip runs diagonally across the lower palm. The heel of the hand presses against the grip. Fingers hang naturally open and relaxed in front of the bow.
Pros:
- ✅ Very consistent once mastered
- ✅ Standard for Olympic recurve shooters
- ✅ Natural wrist position for long sessions
Cons:
- ⚠️ More difficult to learn initially
- ⚠️ Bow drops forward after shot (needs wrist sling)
High Wrist Grip
Common in compound archery
The wrist is higher and more neutral, with the grip fitting between the thumb pad and the inside edge of the thumb. The hand is more vertical against the grip. Fingers may wrap slightly around the front.
Pros:
- ✅ More intuitive for beginners
- ✅ Standard for compound archery
- ✅ Easier to maintain a loose grip
Cons:
- ⚠️ Can be inconsistent if wrist height varies
- ⚠️ Beginners may unconsciously grip the bow
For recurve, a low wrist grip is the standard and most coaches will teach it from day one. For compound, high wrist is common but low wrist compound grips exist too. The critical factor is not which style you use — it's that the bow rests only on the pressure point and your hand stays completely relaxed through the shot.
🎯 The Pressure Point: Getting It Right Every Shot
The bow hand pressure point is not just about where the bow contacts your hand — it's about ensuring the same spot contacts the bow with the same pressure on every single shot. Inconsistent pressure placement is one of the most common causes of unexplained group scattering in otherwise technically sound archers.
Setting the Pressure Point — Step by Step
- With the bow undrawn, place your bow hand against the grip so the thenar eminence (thumb pad) is the main contact point
- The bow grip should sit in the V-shape between your thumb and index finger — touching the thumb pad, but not the web
- Allow your thumb to point naturally toward the target — not clenched, not hyper-extended
- Relax all four fingers — they can hang open, curl lightly, or point down, but must NOT grip the bow
- Draw the bow — notice the draw force pushes the bow back into your hand. Your hand doesn't need to do anything
- At full draw, verify your wrist is not rolled — the grip should feel as if the bow is pushing you, not that you're holding it
The Marker Drill (Fastest Way to Build Consistency)
This is the single most effective drill for developing pressure point consistency:
- Draw a small dot on your thenar eminence with a marker or use a grip sticker
- After each shot, check where the bow grip impression is on your hand
- It should always mark the same spot — if the mark migrates between shots, your grip placement is inconsistent
- Shoot 30 arrows per session with this drill for 2 weeks to build muscle memory
↩️ Eliminating Torque: The Technical Deep Dive
Torque in archery refers to rotational force applied to the bow riser at the moment of release. Even a tiny amount of torque — just a few degrees — can push an arrow several inches off target at 20 meters and significantly more at longer distances. Torque is the hidden enemy of precision archery.
How Torque Gets Into Your Shot
- Gripping the bow: Squeezing rotates the bow clockwise (for right-handed archers), pushing arrows left
- Thumb pressed against grip: Pushes the top of the grip away, rotating bow counter-clockwise, pushing arrows right
- Index finger tension: Curling the index finger into the grip applies lateral torque
- Wrist rolling: Turning the wrist during the draw cycle creates rotational inconsistency
- Elbow tension: A tense bow arm transmits muscle tension into torque at the grip
Torque Elimination Checklist
- ✅ Pressure on thenar eminence ONLY — no contact with fingers or palm
- ✅ Thumb pointing naturally toward the target (not clenched)
- ✅ Index finger NOT touching the bow riser
- ✅ All four fingers relaxed and open (or hanging loosely)
- ✅ Wrist relaxed — not braced against the grip
- ✅ Bow arm elbow rotated out (not locked vertical)
- ✅ Bow arm shoulder down and forward (not raised)
Diagnosing Torque in Your Shots
- • Consistent left drift → Likely gripping too tight (right-hand archer)
- • Consistent right drift → Likely thumb pressure or index contact
- • Groups spread horizontally → Inconsistent grip pressure
- • Good groups sometimes, bad other times → Grip varies under pressure
- • Check with a camera: Film your hand at release — any rotation is visible
🔗 The Finger Sling: Why You Need One
One reason many archers involuntarily grip the bow is fear of dropping it. With an open hand, the bow will fall forward after the shot — and nobody wants to drop a $500 bow. The finger sling (also called an archer's sling or bow sling) solves this problem completely.
Finger Sling
A simple loop that wraps around your thumb and index finger. The bow rests in the open hand, and after release, the sling catches the bow as it falls forward. Preferred by recurve target archers.
- ✅ Allows fully open hand grip
- ✅ Zero restriction on hand during shot
- ✅ Cheap ($3–$15)
- ⚠️ Requires slight adjustment — let the bow fall into the sling
Wrist Sling
Attaches to the bow and wraps around your wrist. More common with compound archers. Holds the bow to your hand rather than requiring you to catch it.
- ✅ Very secure — bow cannot fall far
- ✅ Easy to attach and remove
- ✅ Standard for compound hunting setups
- ⚠️ Slight tension can encourage gripping — keep it loose
Once you trust your sling, you can completely relax your bow hand during the shot. Let the bow fly forward after release — this is the correct follow-through. An archer who fights the bow to keep it from falling is unconsciously introducing grip tension before the shot to pre-compensate.
🚫 Common Grip Errors & How to Fix Them
Error #1: Death Grip (Squeezing the Bow)
What it looks like: White knuckles, fingers visibly pressing into the grip, wrist tensed. The most common grip error across all skill levels.
Why it happens: Instinctive reaction to draw force, fear of dropping the bow, or ingrained habit from improper early instruction.
Fix: Use a finger sling so you don't fear dropping the bow. Practice drawing to full draw and consciously opening your fingers one by one. Do blank bale shooting (at 1 meter) to build the habit of a relaxed hand without the pressure of hitting a target.
Error #2: High Palm Contact (Lifeline Grip)
What it looks like: The bow grip sits in the lifeline of the palm rather than on the thumb pad. Often paired with a high wrist position.
Why it happens: Feels stable and natural, but the central palm applies significant torque because it's not on the bow's centerline.
Fix: Use the marker drill to identify where your palm is contacting the grip. Rotate your hand so the grip shifts from your palm center to your thumb pad. It will feel unstable at first — this is normal and goes away with practice.
Error #3: Canted Wrist (Rotating the Bow)
What it looks like: The bow tilts left or right as the wrist rolls in or out. The bow's top limb leans toward or away from the archer.
Why it happens: Shoulder tension causing the bow arm to rotate, or inconsistent wrist position between shots.
Fix: Use a level bubble on your sight or stabilizer to monitor cant. Focus on a relaxed bow arm position with the elbow rotated slightly out. A canted bow is acceptable for some barebow archers if done consistently, but should be avoided by sight archers.
Error #4: Punching the Grip (Pushing Forward)
What it looks like: The bow arm pushes forward aggressively at the shot, or the wrist breaks forward as the string releases.
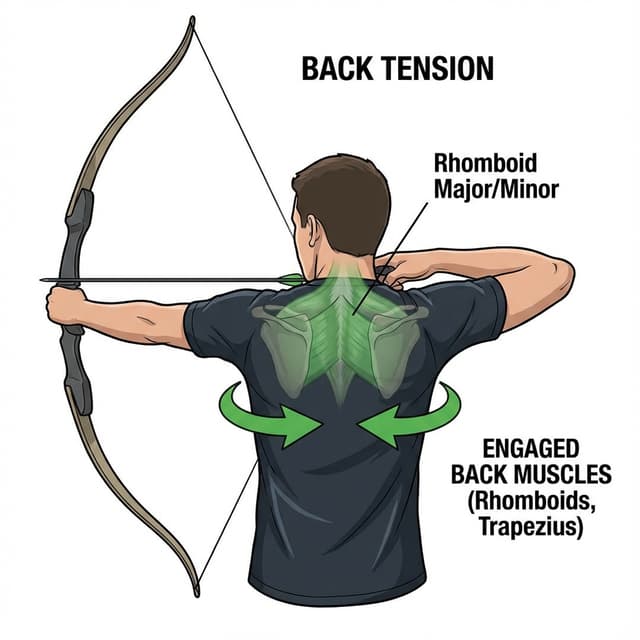
Why it happens: Over-active bow arm, trying to "push" toward the target, or compensating for poor back tension.
Fix: The bow arm should hold steady or move slightly backward (recoil) after release, not punch forward. Focus on back tension driving the shot. A bow arm that punches forward is usually a symptom of a draw side problem — check your back tension technique.
Error #5: Inconsistent Pressure Point Between Shots
What it looks like: Groups are good at short distance but scatter at 30+ yards. Form looks fine but results are random.
Why it happens: The pressure point shifts slightly between shots — close enough that it's hard to detect by feel, but enough to introduce varying torque at distance.
Fix: Use the marker drill consistently. Also consider adding texture tape or a grip wrap to your bow grip to give your hand a more defined and repeatable landing spot.
🏹 Grip Differences by Bow Type
| Bow Type | Grip Style | Key Consideration |
|---|---|---|
| Olympic Recurve | Low wrist, fully open fingers | Bow must fall into sling after shot — no grabbing |
| Compound (target) | High wrist, relaxed fingers | Wrist sling catches bow; thumb and index relax post-shot |
| Compound (hunting) | High wrist, slightly firmer | Slight firmness acceptable in field; never squeeze |
| Traditional longbow | Variable — some hold the shelf | Consistency matters more than style; same grip every shot |
| Barebow recurve | Low wrist, similar to Olympic | Finger position on string and grip must be repeatable for gap shooting |
🎓 Grip Training Drills
Drill 1: Blank Bale Open Hand
Stand 1–2 meters from a target. Draw and shoot with a completely open hand — fingers spread wide and forward, palm face-down. Focus only on the pressure point contact. Since you're so close, missing doesn't matter. This builds the neuromuscular pattern of a relaxed hand. Shoot 20 arrows daily for 2 weeks.
Drill 2: The Marker Drill
Draw a small circle on your thenar eminence. After each shot, check whether the bow grip pressed the circle. Over 30 shots, the marks should cluster in exactly the same spot. If they migrate, your grip placement is inconsistent. Do this every practice session until you can feel the correct contact point without looking.
Drill 3: Mirror or Camera Check
Set up a camera at target level aimed at your bow hand. Review footage after each end looking for wrist rolling, finger movement, or grip changes between setup and release. Video feedback reveals gripping problems invisible during shooting. Most archers are surprised by how much their hand moves when they think it's perfectly still.
Drill 4: Group Test at Multiple Distances
Shoot 6-arrow groups at 10, 20, and 30 meters. If horizontal group size increases dramatically with distance but vertical spread is consistent, torque is the culprit. If both spread randomly, the issue is more likely in your draw side or anchor. Distance amplifies torque — this test precisely identifies if grip is your problem.
❓ Frequently Asked Questions
Why do my arrows keep going left even though my sight is centered?▼
Should I feel the bow grip pressing into my hand during the shot?▼
Do I need a special aftermarket bow grip?▼
Does grip matter as much for compound as for recurve?▼
How long does it take to develop a consistent bow grip?▼
Analyze Your Grip with ArcheryBuddy
ArcheryBuddy's AI form analysis helps you identify grip problems by examining your bow arm, wrist position, and follow-through from video. Get instant feedback on whether grip torque is costing you points.
Grip Guide: Key Takeaways
- ✓Contact the bow ONLY with your thenar eminence (thumb pad) — not your fingers, palm, or lifeline
- ✓Never grip or squeeze the bow — the draw force holds the bow, not your hand
- ✓Use a finger sling or wrist sling so you can relax your hand without fear of dropping the bow
- ✓Torque from inconsistent hand contact is the most common hidden cause of horizontal grouping problems
- ✓Use the marker drill and blank bale practice to build muscle memory for consistent pressure point placement